If you’re looking for a delightful treat that brings a touch of nostalgia, these Peanut Butter Easter Eggs are just the thing! Inspired by everyone’s favorite candy, this homemade version is not only delicious but also a fun project you can do with family or friends. Whether you’re celebrating the holiday or simply craving something sweet, these eggs are perfect for any occasion.
What makes this recipe truly special is the simplicity and joy it brings. With just a handful of wholesome ingredients, you’ll create beautiful speckled eggs that will impress everyone at your gathering. Plus, these treats are fun to make and absolutely irresistible!
Why You’ll Love This Recipe
- Easy to prepare: With just six main ingredients for the filling, you’ll whip these up in no time!
- Family-friendly appeal: Everyone loves peanut butter and chocolate—these eggs are sure to be a hit with kids and adults alike.
- Make-ahead convenience: You can prepare these eggs ahead of time and store them in the fridge, making them ideal for busy days.
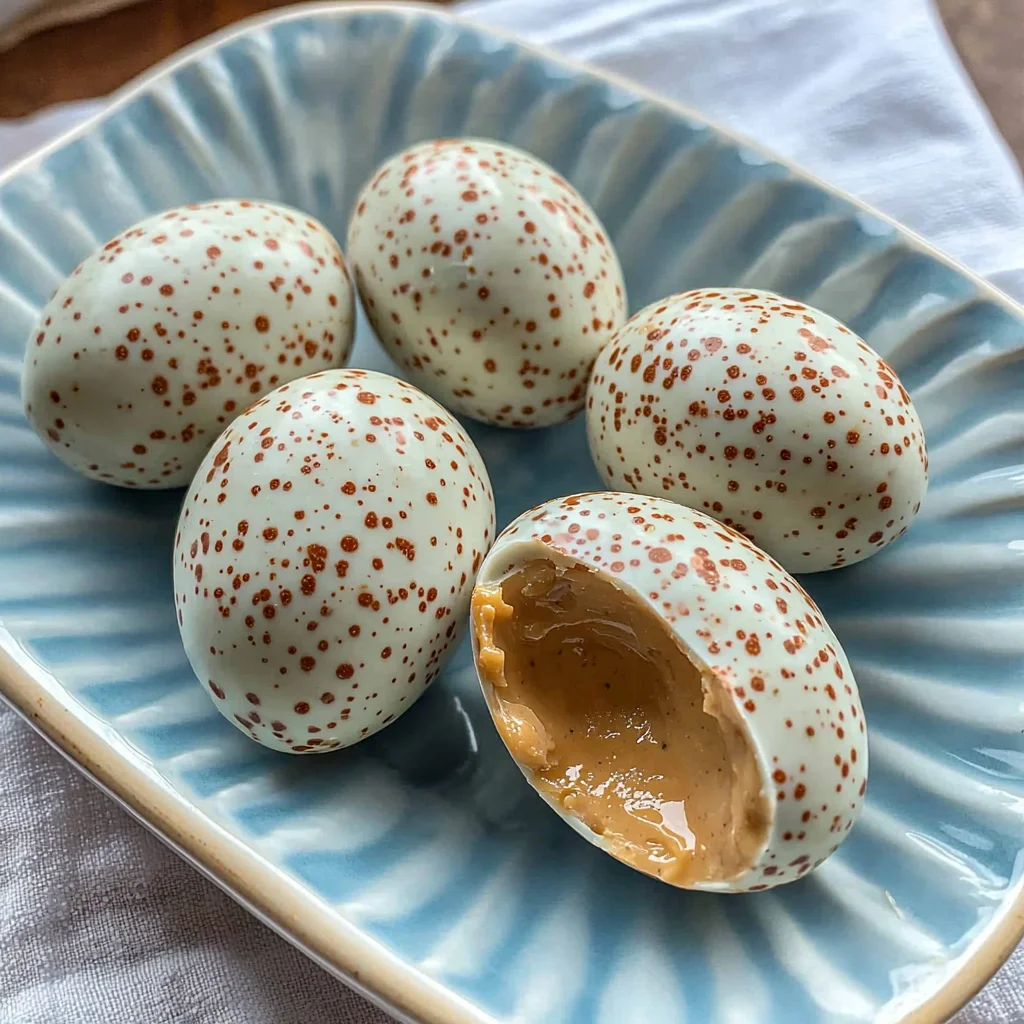
- Deliciously creamy filling: The combination of natural peanut butter and maple syrup creates a rich flavor that’s hard to resist.
- Customizable colors: Use natural dyes for the white chocolate coating to match any theme or occasion!
Ingredients You’ll Need
For this delightful treat, you’ll only need simple, wholesome ingredients that you might already have on hand. Here’s what you’ll need to create your own Peanut Butter Easter Eggs:
For the Filling
- 1 1/4 cup natural, runny peanut butter (no sugar added)
- 1/4 cup maple syrup
- 1/4 cup powdered sugar
- 1/3 cup almond flour
- 1/2 teaspoon vanilla extract
- Pinch of salt
For the Coating
- 8 ounces white chocolate melting wafers (we use Ghirardelli brand)
- 2 teaspoons coconut oil
- 1/2 teaspoon blue spirulina + 1/4 teaspoon matcha powder (or use a 2:1 ratio of any blue and green food dye)
For the Speckles
- 1 teaspoon cocoa powder + 1 tablespoon water
Variations
This recipe is wonderfully flexible, allowing you to get creative with flavors and presentations. Here are some fun variations you might consider:
- Add some crunch: Mix in crushed nuts or crispy rice cereal into the filling for extra texture.
- Swap out the chocolate: Try dark or milk chocolate melting wafers if you prefer their taste over white chocolate.
- Make it vegan: Use dairy-free white chocolate options along with maple syrup for sweetening.
- Change up the shape: Instead of egg shapes, roll the mixture into small balls or use cookie cutters for different designs!
How to Make Peanut Butter Easter Eggs
Step 1: Prepare the Filling
In a mixing bowl, beat together the natural peanut butter, maple syrup, powdered sugar, almond flour, vanilla extract, and a pinch of salt until everything is well combined. This step is important because it ensures that all flavors meld beautifully together into a creamy mixture.
Step 2: Shape the Eggs
Portion out the peanut butter filling into 2-tablespoon portions. Roll each portion into a ball using your hands and then gently shape each ball into an oval (egg-shaped). This step helps create that classic Easter egg look!
Step 3: Freeze While Preparing Coating
Place your shaped eggs on a parchment paper-lined baking sheet and pop them in the freezer while you prepare the chocolate coating. Freezing helps solidify them so they hold their shape during dipping.
Step 4: Create Chocolate Mixture
In a small bowl, whisk together cocoa powder and water to set aside for later speckling. Then add white chocolate melting wafers and coconut oil to a microwave-safe bowl. Microwave in intervals of 15-20 seconds, stirring well between each interval until fully melted. Stir in blue spirulina and matcha for coloring; adjust as desired.
Step 5: Coat The Eggs
Coating works best when your eggs are semi-frozen. It helps the white chocolate firm up quickly without pooling! Stick a toothpick into one end of an egg and dip it into the melted white chocolate. Let excess drip off before placing back onto parchment paper—be careful not to wait too long before removing the toothpick as it may crack.
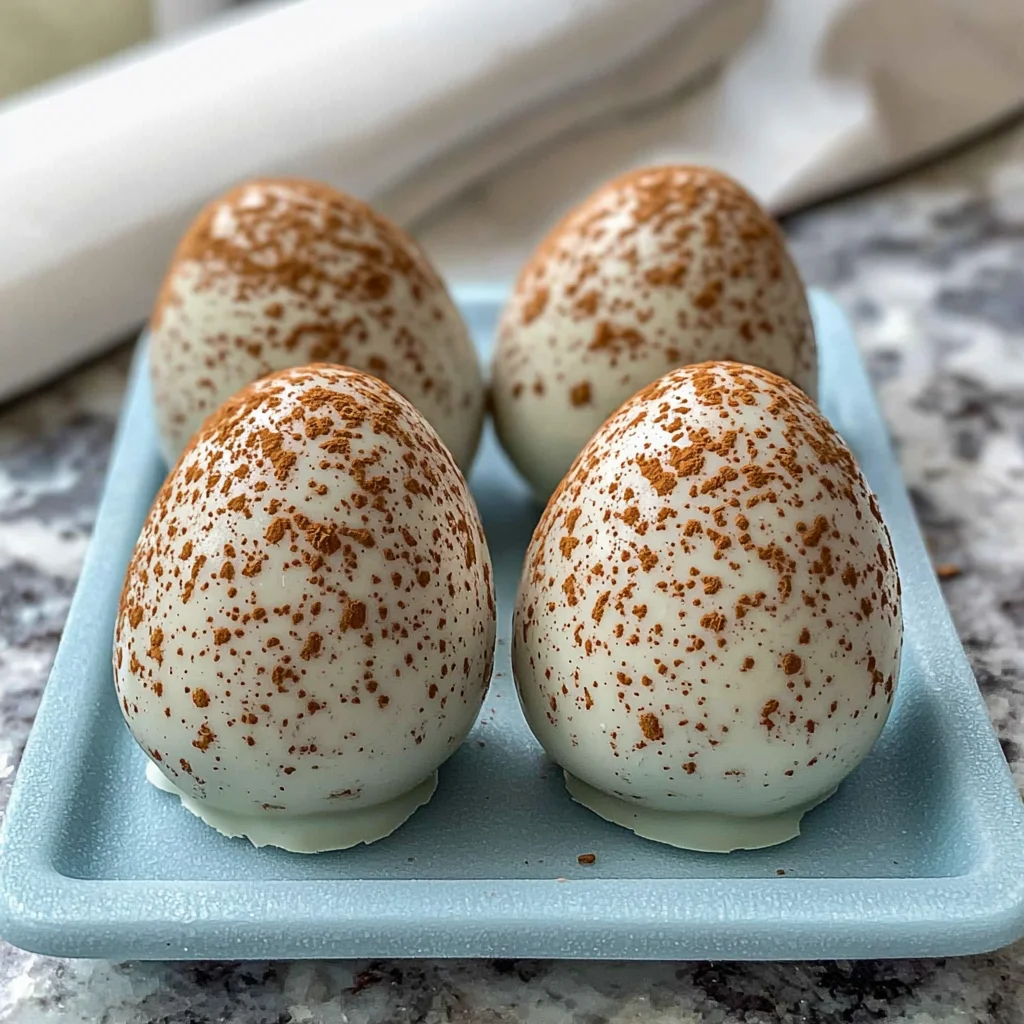
Step 6: Add The Speckles
To create those adorable speckles, dip a pastry brush into your cocoa powder/water mixture. Holding it about 8 inches above your coated eggs, flick the tip of the brush over them gently. This can get messy—so maybe wear an apron! After speckling, refrigerate until everything dries out—about ten minutes will do.
And there you have it—your very own homemade Peanut Butter Easter Eggs! Enjoy sharing these delightful treats with loved ones or keeping them all to yourself (no judgment here!).
Pro Tips for Making Peanut Butter Easter Eggs
Creating the perfect batch of Peanut Butter Easter Eggs is easy with a few helpful tips!
-
Use room temperature peanut butter: This ensures that your filling is smooth and easy to mix, leading to a creamier texture in each egg.
-
Chill the filling: Freezing the peanut butter eggs before coating them helps the white chocolate set quickly, which prevents pooling and keeps the eggs looking neat.
-
Temperature control for chocolate: Melt the white chocolate slowly and at low power in the microwave. This prevents scorching and helps you achieve a silky-smooth coating.
-
Experiment with colors: Don’t be afraid to play with different natural food dyes to create unique designs. It adds a fun twist to your Easter treats!
-
Keep it tidy: Use parchment paper under your eggs while they cool. It makes cleanup easier and prevents sticking, allowing for a beautiful presentation.
How to Serve Peanut Butter Easter Eggs
These delightful Peanut Butter Easter Eggs are not only delicious but can also be presented beautifully for any gathering or celebration!
Garnishes
- Chopped nuts: Sprinkle some chopped almonds or walnuts on top to add a crunchy texture that complements the creamy filling.
- Cocoa powder dusting: A light dusting of cocoa powder gives an elegant touch and enhances the chocolate flavor.
Side Dishes
- Fresh fruit platter: A colorful assortment of berries and sliced fruits provides a refreshing contrast to the rich peanut butter eggs.
- Vanilla ice cream: The creamy sweetness of vanilla ice cream pairs beautifully with the nutty flavors of the Easter eggs, making for a satisfying dessert combo.
- Chocolate-dipped strawberries: These classic treats offer an extra layer of indulgence that complements the flavors in your homemade candy.
- Carrot sticks with hummus: For a healthier option, serve crunchy carrot sticks alongside creamy hummus, providing a balance of sweet and savory.
Make Ahead and Storage
This Peanut Butter Easter Eggs recipe is perfect for meal prep, allowing you to enjoy homemade treats whenever you crave them!
Storing Leftovers
- Keep your leftover peanut butter eggs in an airtight container.
- Store in the refrigerator for up to one week.
- Make sure to place parchment paper between layers if stacking to prevent sticking.
Freezing
- To freeze, arrange the eggs in a single layer on a baking sheet and freeze until solid.
- Once frozen, transfer them to a freezer-safe container or zip-top bag.
- They can be stored in the freezer for up to three months.
Reheating
- These treats are best enjoyed cold or at room temperature.
- If you’d like them slightly softened, let them sit at room temperature for about 10-15 minutes before serving.
FAQs
Can I use other nut butters instead of peanut butter for these Easter eggs?
Absolutely! You can substitute almond butter, cashew butter, or any other nut butter of your choice. Just ensure it has a similar consistency for the best results.
How can I make my Peanut Butter Easter Eggs more colorful?
You can adjust the colors by using different food dyes or natural colorants like beet juice for red and turmeric for yellow. Get creative with your colors!
What is the best way to store Peanut Butter Easter Eggs?
Store your Peanut Butter Easter Eggs in an airtight container in the refrigerator for up to a week or freeze them for longer storage.
Final Thoughts
These Peanut Butter Easter Eggs are not only delicious but also fun to make, bringing a bit of joy into any kitchen! I hope you have as much fun whipping up this recipe as I did. Enjoy sharing these delightful treats with friends and family, or keep them all to yourself—no judgment here!
Peanut Butter Easter Eggs
- Prep Time: 15 minutes
- Cook Time: 10 minutes
- Total Time: 25 minutes
- Yield: About 12 servings (12 eggs) 1x
- Category: Dessert
- Method: No-bake
- Cuisine: American
Description
Peanut Butter Easter Eggs are a delightful and nostalgic treat that everyone will love. These homemade candies combine the creamy richness of natural peanut butter with a sweet maple syrup filling, all encased in a colorful white chocolate coating. Perfect for any occasion, whether you’re celebrating Easter or simply indulging in something sweet, these eggs are as fun to make as they are to eat! With just a handful of wholesome ingredients, you can create beautiful speckled eggs that impress family and friends. Plus, they offer endless opportunities for customization—experiment with colors and shapes to make them uniquely yours!
Ingredients
- 1 1/4 cup natural, runny peanut butter (no sugar added)
- 1/4 cup maple syrup
- 1/4 cup powdered sugar
- 1/3 cup almond flour
- 1/2 teaspoon vanilla extract
- Pinch of salt
- 8 ounces white chocolate melting wafers
- 2 teaspoons coconut oil
- 1/2 teaspoon blue spirulina + 1/4 teaspoon matcha powder
- 1 teaspoon cocoa powder + 1 tablespoon water
Instructions
- In a mixing bowl, combine peanut butter, maple syrup, powdered sugar, almond flour, vanilla extract, and salt until smooth.
- Shape the mixture into oval egg shapes and place on a parchment-lined baking sheet.
- Freeze the eggs for about 30 minutes.
- Melt white chocolate wafers with coconut oil in the microwave until smooth; add colorings if desired.
- Dip each frozen egg into the melted chocolate and return to the parchment paper.
- Create speckles using cocoa powder mixed with water by flicking it over the coated eggs.
- Refrigerate until set.
Nutrition
- Serving Size: 1 Peanut Butter Easter Egg (35g)
- Calories: 145
- Sugar: 9g
- Sodium: 60mg
- Fat: 9g
- Saturated Fat: 3g
- Unsaturated Fat: 6g
- Trans Fat: 0g
- Carbohydrates: 14g
- Fiber: 1g
- Protein: 3g
- Cholesterol: 0mg
Leave a Comment