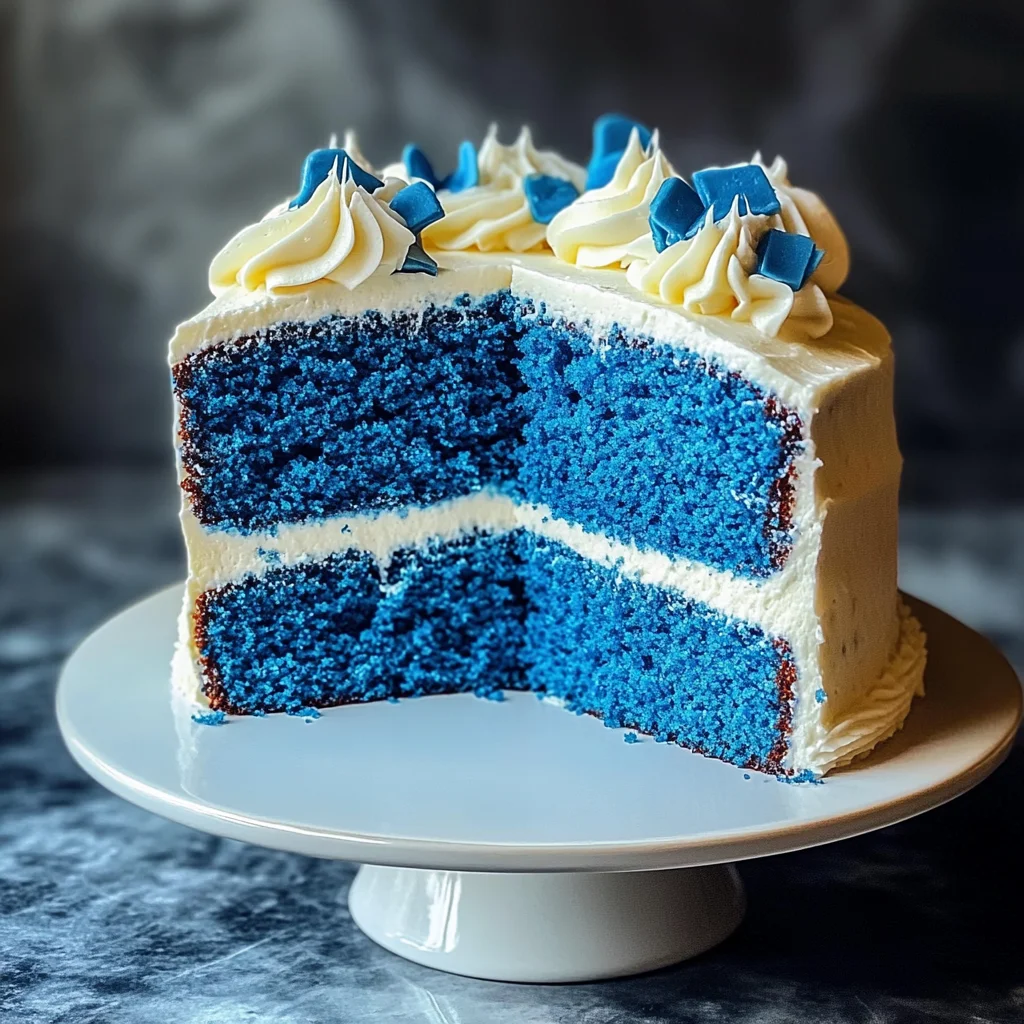
If you’re looking for a dessert that’s not only stunning but also incredibly delicious, let me introduce you to my beloved Lush and Dreamy Blue Velvet Cake. This cake has a magical way of brightening up any gathering with its vibrant color and soft texture. Imagine slicing into a cake that looks like it jumped out of a fairy tale, while the rich flavors dance on your palate.
What makes this recipe so special is how simple it is to create. You don’t have to be a baking expert to whip up this beauty! Whether you’re celebrating a birthday, enjoying a casual brunch with friends, or just treating yourself on a busy weeknight, this cake will surely impress. So roll up your sleeves and get ready to bake something unforgettable!
Why You’ll Love This Recipe
- Easy to Make: This recipe is straightforward, making it perfect for bakers of all levels. You’ll feel like a pro in no time!
- Stunning Presentation: The vibrant blue color makes for an eye-catching dessert that is sure to spark conversations at your table.
- Deliciously Versatile: Enjoy it as is or customize flavors to suit your taste—there’s so much potential!
- Perfect for Any Occasion: Whether it’s a holiday celebration or simply because you deserve a treat, this cake fits right in.
- Make-Ahead Friendly: Bake it in advance and frost it later; this cake stays fresh and delightful for days!
Ingredients You’ll Need
Let’s gather our simple and wholesome ingredients for this Lush and Dreamy Blue Velvet Cake. Don’t worry; you probably have most of these items already in your kitchen!
For the Cake:
- 2 1/2 cups all-purpose flour
- 1/4 cup unsweetened cocoa powder
- 1 3/4 cups granulated sugar
- 1 tsp baking soda
- 1/2 tsp salt
- 1 cup vegetable oil
- 4 large eggs
- 1 cup buttermilk
- 2 tbsp blue food coloring
- 2 tsp vanilla extract
For the Frosting:
- 8 oz cream cheese, softened
- 1/2 cup unsalted butter, softened
- 4 cups powdered sugar
- 2 tsp vanilla extract
Variations
This recipe is wonderfully flexible! Feel free to get creative with different flavors and textures.
- Swap the flavor: Instead of vanilla extract, try almond extract for a nutty twist!
- Add some zest: Incorporate citrus zest (like lemon or orange) into the batter for a refreshing hint.
- Change up the frosting: Use whipped coconut cream instead of cream cheese frosting for a lighter option.
- Layer it up: Bake the cake in three layers instead of two for an extra show-stopping dessert!
How to Make Lush and Dreamy Blue Velvet Cake
Step 1: Preheat Your Oven
Preheat your oven to 350°F (175°C). Greasing your cake pans with nonstick spray or lining them with parchment paper ensures easy removal after baking. No one likes a cake stuck in the pan!
Step 2: Mix Dry Ingredients
In a large bowl, whisk together the flour, cocoa powder, baking soda, and salt. This step ensures an even distribution of the dry ingredients before combining them with the wet mixture. It’s essential for achieving that perfect texture.
Step 3: Combine Wet Ingredients
In another bowl, beat together the oil, sugar, eggs, buttermilk, blue food coloring, and vanilla until smooth. Mixing these ingredients well creates that luscious batter full of flavor.
Step 4: Combine Wet and Dry Mixtures
Gradually add your dry mixture to the wet mixture until just combined—this helps keep our cake tender! Remember not to overmix; we want that dreamy softness.
Step 5: Bake Your Cakes
Divide the batter evenly between your prepared pans. Bake in the preheated oven for about 25-30 minutes or until a toothpick inserted comes out clean. The delightful aroma will fill your kitchen—trust me!
Step 6: Cool Down
Once baked, cool your cakes in their pans for ten minutes before transferring them to wire racks. Allowing them to cool completely prevents melting off all that lovely frosting later on.
Step 7: Make the Frosting
For the frosting, beat together softened cream cheese and butter until creamy. Gradually add powdered sugar and vanilla until smooth—this creamy goodness will elevate each slice!
Step 8: Frost Away
Now it’s time to frost those cooled cakes as desired! Let your creativity shine as you decorate—this is where you can really make it special.
Enjoy every bite of your Lush and Dreamy Blue Velvet Cake!
Pro Tips for Making Lush and Dreamy Blue Velvet Cake
Baking can be a delightful adventure, and with a few handy tips, you can make your blue velvet cake even more special!
-
Use Room Temperature Ingredients: Bringing your eggs and buttermilk to room temperature helps create a smoother batter, resulting in a more tender and moist cake.
-
Measure Flour Properly: Spoon the flour into your measuring cup and level it off with a knife. This prevents packing it down, which can lead to a dense cake.
-
Don’t Overmix the Batter: Mixing just until combined ensures you keep the cake light and airy. Overmixing can develop the gluten in flour, causing the cake to be tough rather than tender.
-
Cool Cakes Completely Before Frosting: Allowing the cakes to cool completely helps prevent the frosting from melting and sliding off, giving you beautifully frosted layers.
-
Experiment with Flavor Variations: Feel free to customize your flavors! Substituting almond extract for vanilla or adding lemon zest can add an exciting twist and elevate this classic dessert.
How to Serve Lush and Dreamy Blue Velvet Cake
Presenting your lush blue velvet cake is as important as baking it! With its stunning color, this cake is sure to impress. Here are some ideas on how to serve it beautifully:
Garnishes
-
Fresh Berries: Adding a handful of fresh raspberries or blueberries not only enhances the visual appeal but also provides a lovely tart contrast to the sweetness of the cake.
-
Edible Flowers: A few edible flowers on top can create an elegant touch, making your dessert feel extra special for any occasion.
Side Dishes
-
Whipped Coconut Cream: Light and fluffy, whipped coconut cream pairs wonderfully with the rich flavor of blue velvet cake, adding a refreshing element.
-
Fruit Salad: A vibrant fruit salad brings brightness and freshness that complements the richness of the cake. Try using seasonal fruits for optimal flavor!
-
Vanilla Ice Cream: A scoop of creamy vanilla ice cream alongside your slice will create a delicious contrast in texture and temperature—truly indulgent!
-
Coffee or Tea: Serving slices with a warm beverage like coffee or herbal tea enhances the overall experience while providing balance to the sweetness of the cake.
By following these serving suggestions, your lush and dreamy blue velvet cake will not only taste divine but also look stunning on any table! Enjoy creating sweet memories with every bite.

Make Ahead and Storage
This lush and dreamy blue velvet cake is perfect for meal prep or entertaining, as it can be made in advance and stored for later enjoyment. Follow these tips to keep your cake fresh and delicious!
Storing Leftovers
- Store leftover cake in an airtight container at room temperature for up to three days.
- For longer freshness, refrigerate the cake, but allow it to come to room temperature before serving.
Freezing
- Wrap individual slices or the whole cake tightly in plastic wrap, then place in a freezer-safe container.
- The cake can be frozen for up to three months. Just remember to label it with the date!
Reheating
- If you prefer your cake slightly warmed, preheat your oven to 350°F (175°C).
- Place slices on a baking sheet and warm for about 10 minutes, or until just heated through.
FAQs
Here are some common questions about making this delightful dessert:
Can I customize the flavors of the Lush and Dreamy Blue Velvet Cake?
Absolutely! You can substitute almond extract for vanilla or add citrus zest to give it a refreshing twist that complements the sweetness beautifully.
How should I store my Lush and Dreamy Blue Velvet Cake leftovers?
You can store leftover cake in an airtight container at room temperature for up to three days. For longer shelf life, refrigerate it.
What if I want to make Lush and Dreamy Blue Velvet Cake ahead of time?
This cake is great for meal prep! You can bake it a day or two in advance and store it properly until you’re ready to frost and serve.
Can I use a different type of frosting on my blue velvet cake?
Yes! While cream cheese frosting pairs perfectly with blue velvet cake, feel free to experiment with buttercream or whipped cream alternatives that suit your taste.
How do I ensure my Lush and Dreamy Blue Velvet Cake turns out perfectly?
To avoid overmixing the batter after adding dry ingredients, mix until just combined. This will help maintain that velvety texture you’re aiming for!
Final Thoughts
I hope you find joy in baking this lush and dreamy blue velvet cake! It’s not only visually stunning but also incredibly delicious, making it a wonderful treat for any occasion. Enjoy every moment of the baking process, and don’t forget to share this delightful creation with friends and family. Happy baking!

Lush and Dreamy Blue Velvet Cake
- Prep Time: 20 minutes
- Cook Time: 30 minutes
- Total Time: 50 minutes
- Yield: Serves approximately 12 slices 1x
- Category: Dessert
- Method: Baking
- Cuisine: American
Description
If you’re in search of a dessert that wows both the eyes and the taste buds, look no further than the Lush and Dreamy Blue Velvet Cake. This enchanting cake features a stunning blue hue and a soft, velvety texture that is sure to elevate any gathering. Perfect for birthdays, casual brunches, or simply as a delightful treat after a long day, this cake is not only easy to make but also incredibly rewarding. With layers of rich flavors and a creamy frosting, it’s an unforgettable centerpiece that will leave everyone asking for seconds. Get ready to impress your guests with this simple yet spectacular dessert!
Ingredients
- 2 1/2 cups all-purpose flour
- 1/4 cup unsweetened cocoa powder
- 1 3/4 cups granulated sugar
- 1 tsp baking soda
- 1/2 tsp salt
- 1 cup vegetable oil
- 4 large eggs
- 1 cup buttermilk
- 2 tbsp blue food coloring
- 8 oz cream cheese, softened
- 1/2 cup unsalted butter, softened
- 4 cups powdered sugar
- 2 tsp vanilla extract
Instructions
- Preheat your oven to 350°F (175°C) and prepare your cake pans.
- In a large bowl, whisk together the flour, cocoa powder, baking soda, and salt.
- In another bowl, beat together the oil, sugar, eggs, buttermilk, blue food coloring, and vanilla until smooth.
- Gradually add your dry mixture to the wet mixture until just combined.
- Divide the batter evenly between your prepared pans and bake for 25-30 minutes or until a toothpick inserted comes out clean.
- Cool your cakes in their pans for ten minutes before transferring them to wire racks.
- For the frosting, beat together the softened cream cheese and butter until creamy. Gradually add powdered sugar and vanilla until smooth.
- Frost the cooled cakes as desired.
Nutrition
- Serving Size: 1 slice - approximately 80g
- Calories: 298
- Sugar: 32g
- Sodium: 250mg
- Fat: 14g
- Saturated Fat: 7g
- Unsaturated Fat: 6g
- Trans Fat: 0g
- Carbohydrates: 39g
- Fiber: 0g
- Protein: 3g
- Cholesterol: 72mg

Leave a Comment