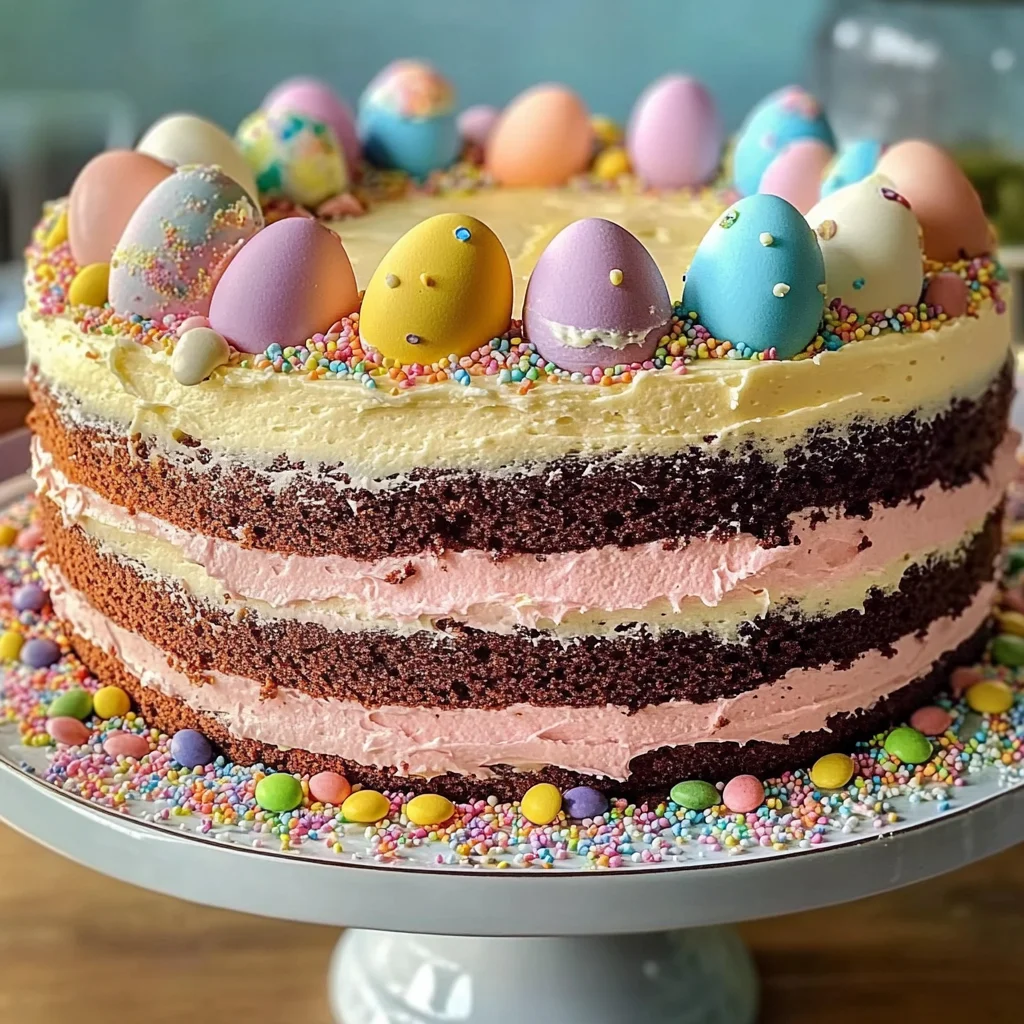
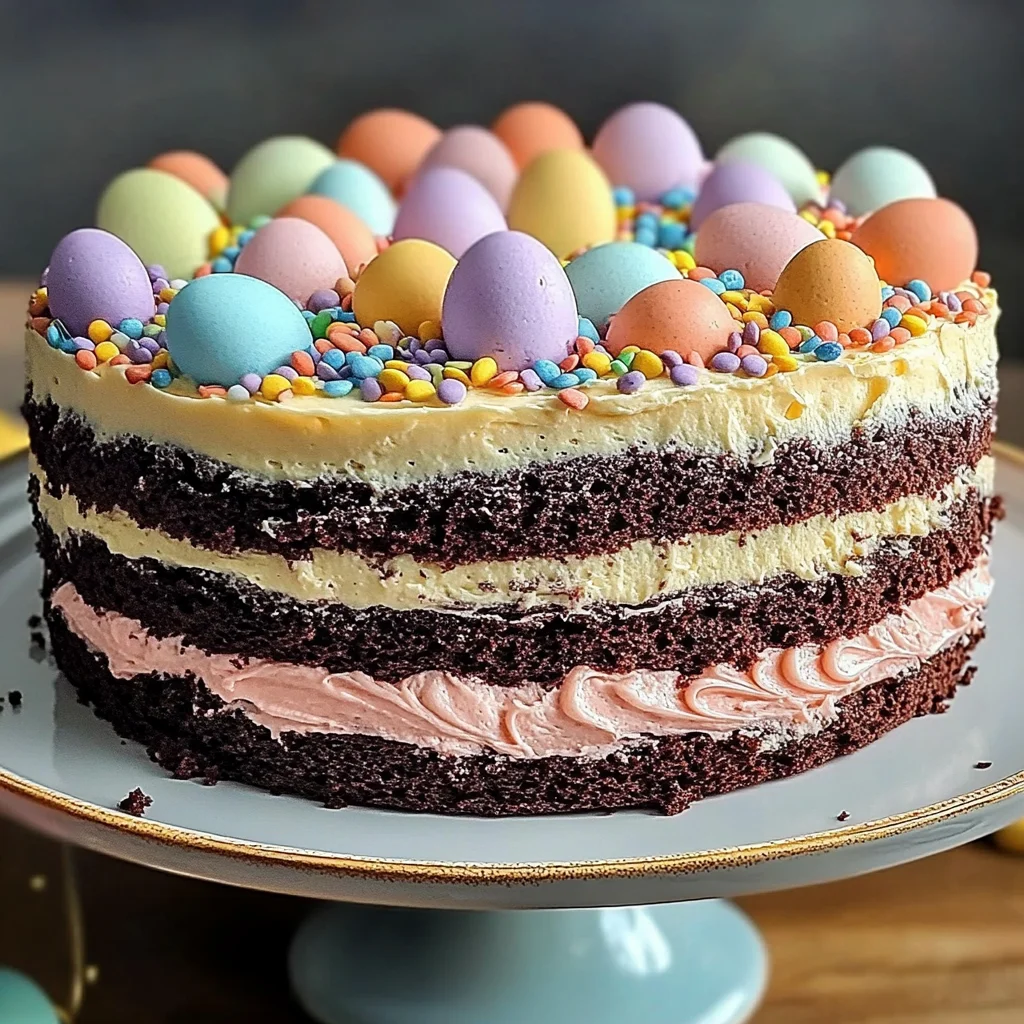
If you’re looking for a show-stopping dessert that captures the joy of Easter, you’ve come to the right place! The Easter Egg Layer Cake is not just any cake; it’s a delightful creation filled with surprises that will have everyone smiling. Every slice reveals hidden chocolate eggs or sweet candies, making it a fun treat for both kids and adults alike. This cake has become a beloved part of my Easter celebrations, and I can’t wait to share it with you!
This recipe is perfect for family gatherings, festive brunches, or simply as a special way to brighten your day. Trust me; baking this cake is as enjoyable as eating it. Let’s dive into why this recipe will quickly become a favorite in your home!
Why You’ll Love This Recipe
- Easy to Prepare: With just a few simple steps, you can whip up this stunning cake without breaking a sweat.
- Family-Friendly: Everyone loves chocolate! This cake is sure to be a hit with kids and adults alike.
- Customizable: Feel free to get creative! Add your favorite candies or swap out flavors for a personal touch.
- Make-Ahead Option: Bake the layers in advance and assemble them later for a stress-free celebration.
- Stunning Presentation: The layers and hidden surprises make this cake not only delicious but also visually impressive.
Ingredients You’ll Need
Gathering the ingredients for this Easter Egg Layer Cake is simple and fun! You’ll find that these wholesome items are likely already in your pantry or easy to grab at the store. Here’s what you’ll need:
For the Cake
- All-Purpose Flour
- Cocoa Powder
- Sugar
- Baking Powder
- Salt
- Large Eggs
- Whole Milk
- Vegetable Oil
- Vanilla Extract
For the Filling
- Chocolate Eggs or Candies (for filling)
Variations
One of the best parts about this recipe is its flexibility! Feel free to experiment with different flavors and decorations. Here are some fun ideas:
- Swap the flavor: Try using almond or lemon extract instead of vanilla for a fresh twist.
- Add some crunch: Incorporate sprinkles or mini chocolate eggs into the batter for an extra pop of color.
- Go gluten-free: Substitute all-purpose flour with a gluten-free blend for those with dietary restrictions.
- Change up the frosting: Use whipped cream or a fruity glaze instead of traditional frosting for lighter options.
How to Make Easter Egg Layer Cake
Step 1: Preheat Your Oven
Start by preheating your oven to 350°F (175°C) and greasing two round cake pans. This step ensures your cakes bake evenly and don’t stick when it’s time to take them out!
Step 2: Mix Dry Ingredients
In a large bowl, whisk together the flour, cocoa powder, sugar, baking powder, and salt until well combined. Mixing these dry ingredients first helps distribute the leavening agents evenly throughout the batter.
Step 3: Combine Wet Ingredients
In another bowl, mix together the eggs, milk, vegetable oil, and vanilla extract until smooth. These wet ingredients add moisture and richness to your cake, making each bite fluffy and delicious.
Step 4: Combine Wet and Dry Mixtures
Gently fold the wet ingredients into the dry mixture until just combined. Be careful not to overmix; we want our cake light and airy!
Step 5: Bake Your Layers
Divide the batter evenly between your prepared pans and bake for 25-30 minutes. To check if they’re done, insert a toothpick in the center; if it comes out clean, they’re ready!
Step 6: Cool & Assemble
Once baked, let your cakes cool in their pans for about 10 minutes before transferring them to wire racks. After they’ve cooled completely, layer them with frosting and hide those delightful chocolate eggs between layers for surprise-filled slices.
And there you have it! Your beautiful Easter Egg Layer Cake is ready to steal the show at your next gathering. Enjoy every delicious bite!
Pro Tips for Making Easter Egg Layer Cake
Creating the perfect Easter Egg Layer Cake can be a delightful experience, especially with these handy tips!
Choose high-quality ingredients: Using the best flour, cocoa powder, and chocolate eggs will enhance the flavor and texture of your cake, making every bite an exceptional treat.
Room temperature ingredients: Ensure that your eggs and milk are at room temperature before mixing. This helps create a smoother batter and results in a lighter, fluffier cake.
Do not overmix: Gently folding the wet and dry ingredients together helps prevent gluten development, keeping your cake tender and airy. Remember, a few lumps are okay!
Level your cakes: If your cakes dome while baking, use a serrated knife to level them before frosting. This ensures even layers and makes for a stunning presentation.
Chill before decorating: Allow the cakes to cool completely before frosting. Chilling them in the fridge for 30 minutes can make handling easier and help prevent the frosting from sliding off.
How to Serve Easter Egg Layer Cake
Presenting your Easter Egg Layer Cake can be as enjoyable as baking it! Here are some creative ideas to make your dessert shine at any gathering.
Garnishes
- Fresh berries: Adding strawberries or raspberries on top adds a splash of color and freshness that beautifully complements the rich chocolate layers.
- Whipped coconut cream: A dollop of this dairy-free whipped topping provides a light contrast to the density of the cake while keeping it festive.
- Edible flowers: Scatter some edible flowers around your cake for an enchanting springtime touch that enhances its visual appeal.
Side Dishes
- Fruit salad: A refreshing mix of seasonal fruits balances the sweetness of the cake and offers guests a lighter option alongside their dessert.
- Vanilla ice cream: A scoop of creamy vanilla ice cream pairs wonderfully with chocolate cake, providing a cold contrast that enhances each bite.
- Coffee or tea: Serving coffee or herbal tea alongside this cake not only complements its flavors but also adds a cozy touch to your gathering.
- Mini cupcakes: For an extra sweet touch, serve mini cupcakes with colorful frosting. They offer guests another dessert option while being easy to grab and enjoy.
With these tips and serving suggestions, you’re all set to create an unforgettable Easter celebration with your beautiful Easter Egg Layer Cake! Enjoy every moment spent with family and friends as you indulge in this delightful treat. Happy baking!
Make Ahead and Storage
This Easter Egg Layer Cake is not only a festive treat but also an excellent option for meal prep. You can make it ahead of time and store it properly so that you can enjoy its deliciousness without any last-minute rush.
Storing Leftovers
- Store leftover cake in an airtight container at room temperature for up to three days.
- For longer freshness, keep it in the fridge for up to five days.
- If you have any leftover frosting, store it separately in a sealed container in the refrigerator.
Freezing
- Wrap individual slices in plastic wrap and then place them in a freezer-safe bag or container.
- Alternatively, you can freeze the entire cake by wrapping it well in plastic wrap followed by aluminum foil.
- The cake can be frozen for up to three months.
Reheating
- To thaw frozen slices, simply leave them at room temperature for about 1-2 hours.
- For a warm slice, microwave on low power for about 10-15 seconds until warmed through.
- Avoid reheating an entire frosted cake in the microwave to maintain its texture and appearance.
FAQs
Here are some common questions you might have about making your Easter Egg Layer Cake:
Can I use other fillings besides chocolate eggs?
Absolutely! Feel free to experiment with your favorite candies or even fresh fruits. Just ensure they complement the flavor of the cake.
How do I make my Easter Egg Layer Cake more colorful?
Incorporate colorful sprinkles or mini chocolate eggs into the batter before baking. Additionally, you can decorate the top with vibrant frosting and edible decorations.
Can I make this Easter Egg Layer Cake ahead of time?
Yes! You can prepare this cake ahead of time and store it properly. Refer to our ‘Make Ahead and Storage’ section for detailed tips.
What occasions is this cake suitable for besides Easter?
While it’s perfect for Easter celebrations, this cake is also great for birthdays, spring parties, or any festive gathering where you want to impress!
How should I serve the Easter Egg Layer Cake?
Slice into generous pieces and serve on pretty plates. It pairs wonderfully with a scoop of non-dairy ice cream or fresh fruit on the side!
Final Thoughts
I hope you’re as excited about making this delightful Easter Egg Layer Cake as I am! This recipe not only captures the spirit of the season with its vibrant colors but also allows you to share sweet moments with loved ones. Enjoy every layer of joy that comes with baking and sharing this beautiful dessert. Happy baking!
Easter Egg Layer Cake
- Prep Time: 20 minutes
- Cook Time: 30 minutes
- Total Time: 50 minutes
- Yield: Serves 12
- Category: Dessert
- Method: Baking
- Cuisine: American
Description
Create a stunning Easter Egg Layer Cake that’s perfect for celebrations! Easy to make and delicious, it’s sure to impress your guests—try it today!
Ingredients
- All-purpose flour
- Cocoa powder
- Sugar
- Baking powder
- Salt
- Large eggs
- Whole milk
- Vegetable oil
- Vanilla extract
- Chocolate eggs or candies (for filling)
Instructions
- Preheat your oven to 350°F (175°C) and grease two round cake pans.
- In a large bowl, whisk together flour, cocoa powder, sugar, baking powder, and salt.
- In another bowl, combine eggs, milk, vegetable oil, and vanilla extract until smooth.
- Gently fold the wet ingredients into the dry mixture until just combined.
- Divide the batter between prepared pans and bake for 25-30 minutes until a toothpick comes out clean.
- Cool the cakes in pans for 10 minutes before transferring to wire racks. Once cool, layer with frosting and hide chocolate eggs between layers.
Nutrition
- Serving Size: 1 serving
- Calories: 350
- Sugar: 25g
- Sodium: 200mg
- Fat: 15g
- Saturated Fat: 3g
- Unsaturated Fat: 10g
- Trans Fat: 0g
- Carbohydrates: 50g
- Fiber: 2g
- Protein: 5g
- Cholesterol: 60mg

Leave a Comment